To make this the easiest that it can be, you should start with two images that have high contrast edges. This uses very similar techniques as basic compositing in Photoshop and leverages some of its amazing tools.
The point of this is technically to have a beautiful juxtaposition between the two images but honestly who are we kiddin… it just looks cool too.
For the texture, its best to choose something like a tree top or city scape with a clear and definable set of edges. The more contrast between the tree/city and the sky the better. This will make it insanely easy to mask in photoshop and will give it an amazing shape against the background.
Good hard edges = nice and easy photoshoppin
Start with a photo of your subject
It's best to think of an edge on your subject that would look good profiled. Nice long hair or a specific shape of the body might do best because the profiled edge itself is interesting. The left side of the subject has his hair leaning off of his face so it creates a beautifully shaped edge to cut out.
This wasn’t even the best example. I would normally like even more contrast between the subject and the background.
Step 1: Creating a basic selection and mask
You’ll need to cut out your subject like you would in a composite. The quick selection tool is by FAR my favourite option for this type of selection. If you've got a good photo with nice hard edges then it will do a great job for your general selection. It doesn't need to be perfect but you really want it to be as close as possible while giving the least amount of effort.
My trick for the quick selection tool is using its history to your advantage.
Imagine that you’ve started selecting as per usual and you’ve selected too much of an area and selected a portion of your layer that you didn’t want. If you hold the ALT or OPTION button the + signal will turn into a - symbol and will allow you to subtract from your selection instead of add to it. Once you correct your selection then you can go back to selecting what you want and Photoshop will remember that you did not want to select what you subtracted from that selection. This implies something amazing that not a lot of people think of at first. It means that after only one click, once you started selecting, if you let go and turn for the minus tool you can literally paint every area of an image that you do not want selected and Photoshop will remember that that area is off-limits.
This will allow you to have much more specific selections on only your third click.
BAM!
Now while you have your selection active, click the layer mask button and create a layer mask that hides your background.
*note: if you selected your background instead of your subject then your layer mask might be backwards. Either hold ALT when creating the layer mask or just invert it (COMMAND+I) now that it's made.
This looks like absolute garbage so its time to refine it.
Step 2: Refining the mask
The refine mask brush isn’t exactly new but it is still easily one of my most used tools.
Once you’ve created your basic mask and gone as far as you can, you can take it to the next step by going inside the masks tab. It can be found by clicking the masks button that’s located inside the properties tab. It is the same shape as the button you create a mask with at the bottom of the layers tab. This button is present anytime a mask is attached to a layer.
All of the refine tools are located in the Mask Edge window. Click that bad boy and start refinin
Once you’re inside the masks tab, you can do a number of things to alter or change a mask but what we will focus on is the brush tool on the left beside the Edge detection box. It’s MONEY.
The brush is automatically selected by default so just hover over your image and it will be activated.
Now paint over the edges you'd like to refine. Its honestly that easy. The main issue that people have doing this is when they are trying to focus on something like hair when it's against a hard coloured background. Photoshop will always do a better job when it can see the obvious difference between one thing and another.
First, start painting around the areas that you’d like to refine. This works best with high contrast edges. In any form of compositing, you want the most distinguishable difference between your subject and the background. This example is juuuust enough for Photoshop to do a decent job.
As you can see, the right side now has all the fine detail of the hair. The left side is now the target.
Now that we've done both edges, compare the first selection to the refined selection and you can clearly see the value of this process.
It's insanely detailed. Gotta love those Adobe engineers.
You can make the mask even sharper by increasing the contrast with the contrast slider. This will change all the grey areas into either black or white, increasing the sharpness of the mask.
Step 3: Bringing in your second photo
Once you have this refined mask on your subject, it's time to bring in the second texture that you are going to use to create the double exposure.
I literally looked out my apartment window and shot a photo of this tree. Uninspired or work of art... you be the judge.
Overlay your subject layer on top of the second texture. This will be important for setting the blending mode in a few steps. Once you have it arranged like this, you can generally arrange your layers to be in the right spot in relation with each other.
Once this is set, turn off your subject layer.
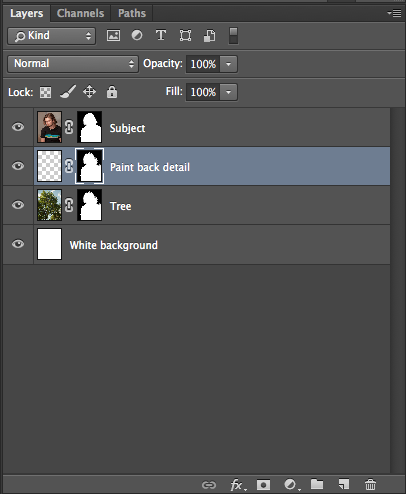
Your layers panel will appear like this:
Step 4: Creating and refining the mask on the texture layer
The real magic of the process is in these next few steps. This is where it gets sexy.
You want to copy the layer mask from your subject layer onto your background layer. You can do that by either COMMAND clicking the layer mask to re-select it and then create a new layer mask using that selection OR you can hold ALT then click and drag the subjects layer mask onto the background layer.
Once you've successfully copied the subject's layer mask onto the texture, it will look like the photo below. I've put another layer underneath of the texture layer as a white background.
Heres the most important part of this process in my opinion. Once you've pasted the mask on this texture layer, you can use the pixels in this image to RE-REFINE the mask. If you click the refine mask tool again and open up the same dialogue box, you can brush around the leaf section on the top right of the subjects head and down his shoulder and it will use the pixels from this image to make the section that you paint over fit the shape of the texture and not the shape of the subject.
You can see that it now holds the exact shape of the subject on the left side and the exact shape of the texture on the right side.
Sexy right?
I increased the contrast on the mask again to make the mask shape around the leaves as vivid and sharp as possible.
Step 5: Change the blending mode of your subject layer
Once you have this layer mask refined and ready to go, its time to turn your subject layer back on and change its blending mode. I've found that the SCREEN blending works best for this effect. NOTE: One of the remaining steps will be based on you also choosing SCREEN.
Note that if we had blended the two images without first refining the mask on the texture layer, the final result is not nearly as cohesive or organic.
Step 6: Paint back detail where you want it
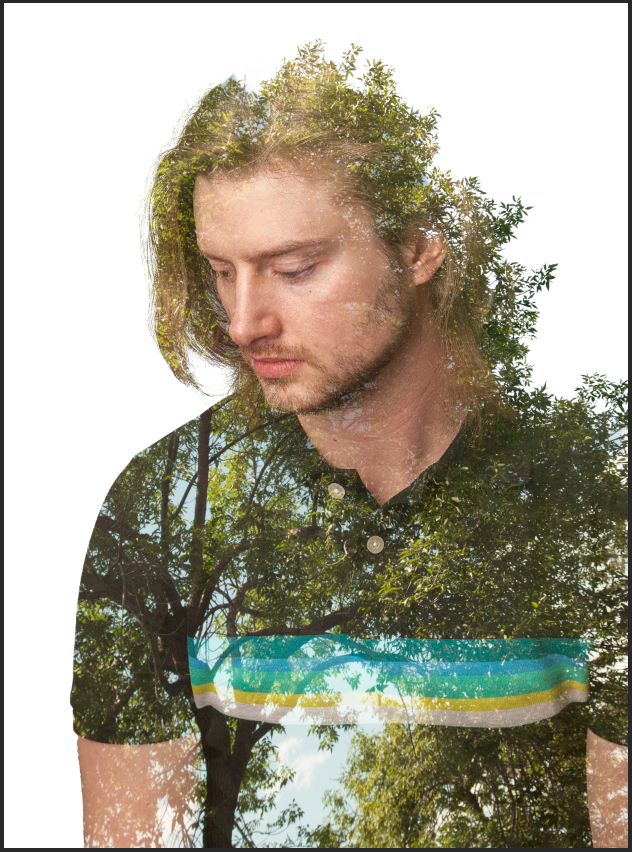
The only remaining step to complete the double exposure is to bring back some of the detail in the areas that you want to see your subject. For instance, his face is almost completely lost in the details of the branches that are blending through it.
With the screen blend mode, the top image will only show the pixels in that layer if they are brighter than the bottom layers. It's not blending with ONLY the texture layer, it's blending with all the layers beneath it.
Apply an empty layer in-between the subject layer and the background layer.
Make sure this layer is in between the two main layers.
To ensure that you stay inside of the border while painting black, use the texture layer's MASK and copy it onto this layer. This will only allow you to paint black inside the confines of this layer mask.
Now just click on the layer and paint with black where ever you want to bring back detail. You can use a variety of techniques to paint like changing your opacity or using my favourite trick... The Fade Brush Tool.
The double exposure effect is now complete. There's only one last step...
Step 7: Make it the sexiest that it can be with a little bit of grading.
Hope this gave you the inspiration to go out and make your own. If it worked for you, let me know. I'd love to get any and all feedback including the photos that you create using this technique.
Email me or hit me up on twitter
Thanks for being a passionate and caring individual. We all make this world a little brighter with every creation we put our heart into.
Chris


